
Insert Data into Room Database in Android: A Kotlin Guide

Insert Data into Room Database in Android: A Kotlin Guide


If you’re learning Android development and wondering how to insert data into Room database in Android, this step-by-step guide is for you. We’ll build a tiny offline feature that saves items locally using Room, Kotlin coroutines, and a simple Jetpack Compose UI. You’ll see how to create your Entity, DAO, and Database classes, how to use the Room DAO insert method correctly, how to handle conflicts, and how to verify that your data was saved. We’ll also include a compact Java example for beginners who are not yet using Kotlin.

What is Room database in Android and why use it?
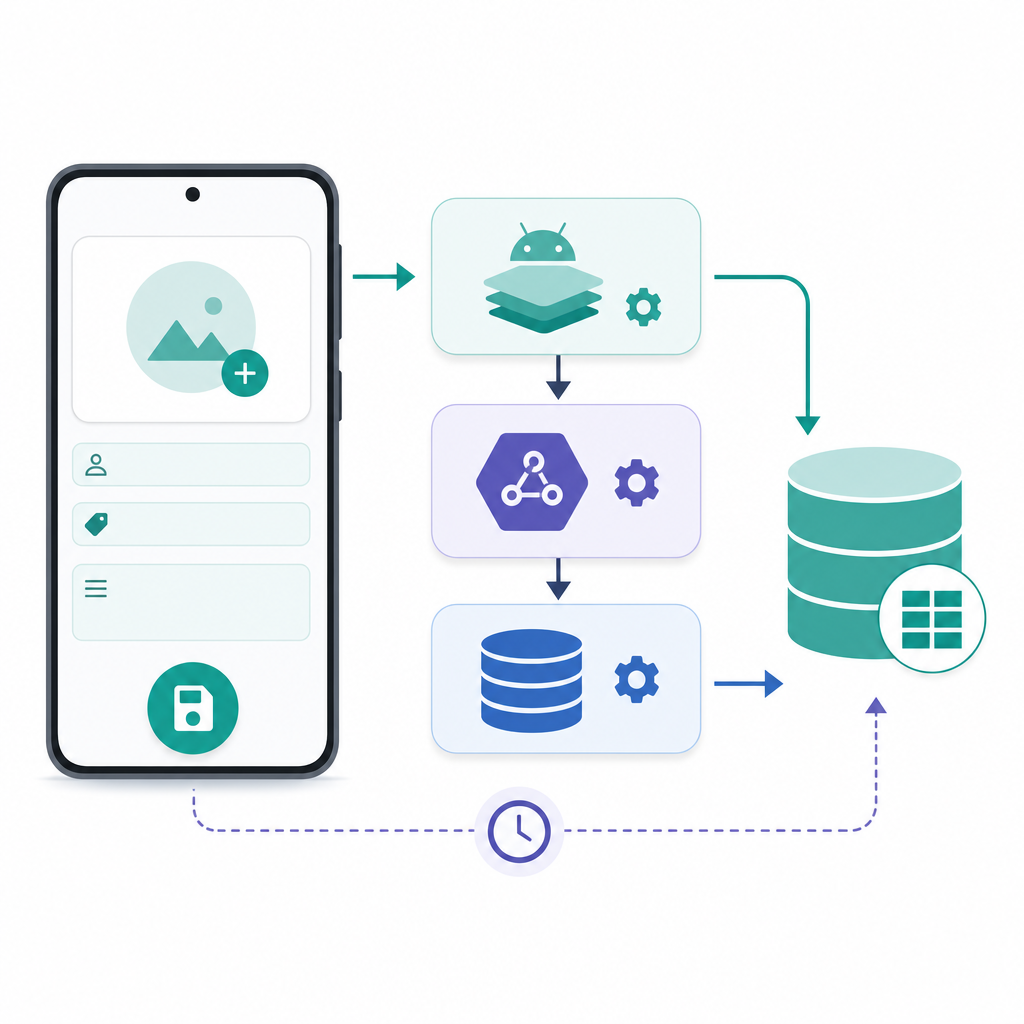
Diagram of how to insert data into Room database in Android: UI to ViewModel/Repository/DAO to database.
End-to-end flow: UI triggers insert, ViewModel/Repository call DAO, data saved with Room.

Room is the official SQLite object-mapping library from Android Jetpack. It lets you define data models as Kotlin/Java classes (Entities), write type-safe queries in DAOs, and get compile-time validation for SQL. Compared to using raw SQLiteOpenHelper, Room reduces boilerplate, catches query errors early, and integrates cleanly with coroutines and Kotlin Flows for reactive updates.

  • Compile-time checked SQL and schema migrations
  • Easy data access with DAOs (@Insert, @Update, @Delete, @Query)
  • Seamless integration with Kotlin coroutines and Flow
  • Battle-tested performance and reliability for saving data locally in Android

What you’ll build
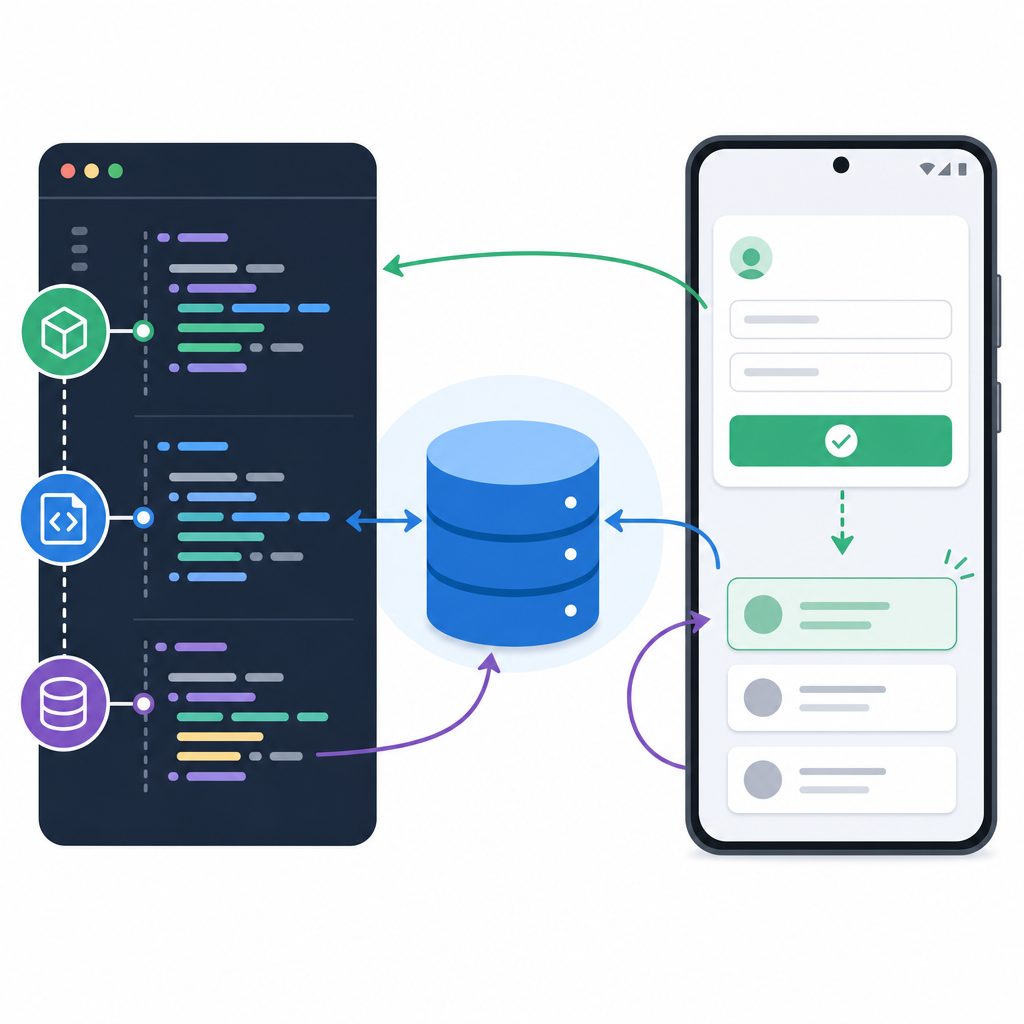
Android Room insert example: user form saves item, DAO persists it, list updates instantly.
Form submission to Room: add an item and see the list refresh after a successful insert.

We’ll build a minimal “Products” example to demonstrate a Room database insert example in Android. You’ll:

  • Create a Product entity with an auto-generated primary key
  • Define a DAO with @Insert and @Upsert methods
  • Build an AppDatabase to provide the DAO
  • Use a Repository and ViewModel to call inserts off the main thread
  • Create a simple Jetpack Compose screen to input and view products
  • Learn how to insert a list of items and how to verify success
Insert flow overview (UI to Room and back)
Compose UI: user taps “Save” with name + quantity
ViewModel: viewModelScope.launch { repo.addProduct(name, qty) }
Repository: builds Product and calls dao.insert(product)
DAO: @Insert suspend fun insert(product): Long (runs off main thread)
RoomDatabase/SQLite: writes row, returns rowId
Flow<List<Product>> emits updated list → UI recomposes to show new item

Project setup (Kotlin + Room + coroutines)

Room 2.8.x is stable and widely used. Room 3.0 (androidx.room3) is also available and primarily targets Kotlin Multiplatform while preserving the core @Insert/@Upsert patterns for Android apps. New Android projects should prefer KSP over KAPT for faster builds.

Gradle configuration (Room 2.8.x with KSP)

Gradle
// settings.gradle or build.gradle versions as per your project

// app/build.gradle (Kotlin DSL is similar)
plugins {
id "com.android.application"
id "org.jetbrains.kotlin.android"
id "com.google.devtools.ksp"
}

android {
// your Android config...
}

dependencies {
implementation "androidx.core:core-ktx:1.13.1"
implementation "androidx.lifecycle:lifecycle-viewmodel-ktx:2.8.3"
implementation "androidx.activity:activity-compose:1.9.1"
implementation platform("androidx.compose:compose-bom:2024.10.01")
implementation "androidx.compose.ui:ui"
implementation "androidx.compose.material3:material3"

// Room
implementation "androidx.room:room-runtime:2.8.4"
implementation "androidx.room:room-ktx:2.8.4"
ksp "androidx.room:room-compiler:2.8.4"

// Coroutines (if not already in your project)
implementation "org.jetbrains.kotlinx:kotlinx-coroutines-android:1.8.1"
}

Optional (Room 3.0 on Android)

If you adopt Room 3.0, artifacts come from the androidx.room3 group. Your @Insert/@Upsert usage stays the same. Check the latest release notes before upgrading.

Step 1: Create the Entity

Our Product will have an auto-generated ID, a name, a quantity, and a timestamp.

Kotlin
Code
// Product.kt
class="cd-package">import androidx.room.Entity
class="cd-package">import androidx.room.PrimaryKey

class="cd-annotation">@Entity(tableName = "products")
data class Product(
    class="cd-annotation">@PrimaryKey(autoGenerate = true) val id: Long = 0,
    val name: String,
    val quantity: Int,
    val createdAt: Long = System.currentTimeMillis()
)

Step 2: Create the DAO with @Insert and @Upsert

DAOs define how you access the database. Insert methods should be suspend so they run off the main thread with coroutines. Room will generate the SQL for you.

Kotlin
Code
// ProductDao.kt
class="cd-package">import androidx.room.Dao
class="cd-package">import androidx.room.Insert
class="cd-package">import androidx.room.OnConflictStrategy
class="cd-package">import androidx.room.Query
class="cd-package">import androidx.room.Upsert
class="cd-package">import kotlinx.coroutines.flow.Flow

class="cd-annotation">@Dao
interface ProductDao {

    // Insert a single Product, return its rowId
    class="cd-annotation">@Insert(onConflict = OnConflictStrategy.ABORT)
    suspend fun insert(product: Product): Long

    // Insert multiple products at once; returns rowIds for each item
    class="cd-annotation">@Insert(onConflict = OnConflictStrategy.IGNORE)
    suspend fun insertAll(products: List<Product>): List<Long>

    // Upsert (insert new, update existing by primary key)
    // Available in Room 2.5+ and kept in newer versions
    class="cd-annotation">@Upsert
    suspend fun upsertAll(products: List<Product>)

    // Query all products as a Flow to observe changes
    class="cd-annotation">@Query("SELECT * FROM products ORDER BY id DESC")
    fun getAll(): Flow<List<Product>>
}

Notes for beginners:

  • @Insert can accept a single entity, a vararg, or a List. It can return a Long or List<Long> for row IDs. This is handy for navigation or showing confirmation.
  • onConflict defines what happens if a row with the same primary key already exists. Common choices are ABORT (default), IGNORE, and REPLACE.
  • @Upsert lets you write “insert or update” logic without managing both paths yourself.
Insert vs Upsert conflict strategies (quick guide)
Option Best for Conflict behavior Return values
@Insert(ABORT) (default) Strict inserts when duplicates should fail Throws on primary key conflict Single Long or List<Long> of rowIds
@Insert(IGNORE) Bulk inserts where duplicates can be skipped Skips conflicting rows IDs for inserted rows; -1 for skipped ones
@Insert(REPLACE) When you want “overwrite” semantics Deletes conflicting row then inserts new RowIds like @Insert (note REPLACE side effects)
@Upsert Insert-or-update without branching logic Inserts new rows; updates existing by primary key Often used without return; use @Insert if you need rowIds

Step 3: Build the RoomDatabase

The database class ties entities and DAOs together. Create a singleton instance and avoid allowing main-thread queries in production.

Kotlin
Code
// AppDatabase.kt
class="cd-package">import android.content.Context
class="cd-package">import androidx.room.Database
class="cd-package">import androidx.room.Room
class="cd-package">import androidx.room.RoomDatabase

class="cd-annotation">@Database(
    entities = [Product::class],
    version = 1,
    exportSchema = true
)
abstract class AppDatabase : RoomDatabase() {
    abstract fun productDao(): ProductDao

    companion object {
        class="cd-annotation">@Volatile class="cd-keyword cd-access">private var INSTANCE: AppDatabase? = null

        fun getInstance(context: Context): AppDatabase =
            INSTANCE ?: synchronized(this) {
                Room.databaseBuilder(
                    context.applicationContext,
                    AppDatabase::class.java,
                    "app.db"
                )
                // Use proper migrations in real apps. For demo only:
                //.fallbackToDestructiveMigration()
                .build()
                .also { INSTANCE = it }
            }
    }
}

Avoid allowMainThreadQueries() in real apps; Room is designed to run I/O off the main thread using coroutines.

Step 4: Repository and ViewModel

The Repository encapsulates data operations and the ViewModel coordinates UI events and background work using viewModelScope.

Kotlin
Code
// ProductRepository.kt
class ProductRepository(class="cd-keyword cd-access">private val dao: ProductDao) {

    val allProducts: Flow<List<Product>> = dao.getAll()

    suspend fun addProduct(name: String, quantity: Int): Long {
        val product = Product(name = name.trim(), quantity = quantity)
        return dao.insert(product)
    }

    suspend fun addAll(products: List<Product>): List<Long> {
        return dao.insertAll(products)
    }

    suspend fun upsertAll(products: List<Product>) {
        dao.upsertAll(products)
    }
}
Kotlin
Code
// ProductViewModel.kt
class="cd-package">import android.app.Application
class="cd-package">import androidx.lifecycle.AndroidViewModel
class="cd-package">import androidx.lifecycle.viewModelScope
class="cd-package">import kotlinx.coroutines.flow.SharingStarted
class="cd-package">import kotlinx.coroutines.flow.stateIn
class="cd-package">import kotlinx.coroutines.launch

class ProductViewModel(app: Application) : AndroidViewModel(app) {

    class="cd-keyword cd-access">private val db = AppDatabase.getInstance(app)
    class="cd-keyword cd-access">private val repo = ProductRepository(db.productDao())

    val products = repo.allProducts
        .stateIn(viewModelScope, SharingStarted.WhileSubscribed(5000), emptyList())

    fun insert(name: String, quantity: Int, onComplete: (Long) -> Unit = {}) {
        viewModelScope.launch {
            val rowId = repo.addProduct(name, quantity)
            onComplete(rowId)
        }
    }

    fun insertList(pairs: List<Pair<String, Int>>, onComplete: (List<Long>) -> Unit = {}) {
        viewModelScope.launch {
            val list = pairs.map { (n, q) -> Product(name = n, quantity = q) }
            val ids = repo.addAll(list)
            onComplete(ids)
        }
    }

    fun upsertList(products: List<Product>, onDone: () -> Unit = {}) {
        viewModelScope.launch {
            repo.upsertAll(products)
            onDone()
        }
    }
}

Step 5: Simple Jetpack Compose UI

This UI lets a user type a product name and quantity, tap Save, and immediately see the inserted item below using a Flow list.

Kotlin
Code
// ProductScreen.kt
class="cd-package">import android.widget.Toast
class="cd-package">import androidx.compose.foundation.layout.*
class="cd-package">import androidx.compose.foundation.lazy.LazyColumn
class="cd-package">import androidx.compose.foundation.lazy.items
class="cd-package">import androidx.compose.material3.*
class="cd-package">import androidx.compose.runtime.*
class="cd-package">import androidx.compose.ui.Modifier
class="cd-package">import androidx.compose.ui.platform.LocalContext
class="cd-package">import androidx.compose.ui.text.input.KeyboardType
class="cd-package">import androidx.compose.ui.unit.dp
class="cd-package">import androidx.lifecycle.viewmodel.compose.viewModel

class="cd-annotation">@Composable
fun ProductScreen(vm: ProductViewModel = viewModel()) {
    val ctx = LocalContext.current
    val products by vm.products.collectAsState()

    var name by rememberSaveable { mutableStateOf("") }
    var quantityText by rememberSaveable { mutableStateOf("1") }

    Column(Modifier.padding(16.dp)) {
        OutlinedTextField(
            value = name,
            onValueChange = { name = it },
            label = { Text("Product name") },
            modifier = Modifier.fillMaxWidth()
        )
        Spacer(Modifier.height(8.dp))
        OutlinedTextField(
            value = quantityText,
            onValueChange = { quantityText = it },
            label = { Text("Quantity") },
            keyboardOptions = androidx.compose.ui.text.input.KeyboardOptions(
                keyboardType = KeyboardType.Number
            ),
            modifier = Modifier.fillMaxWidth()
        )
        Spacer(Modifier.height(12.dp))
        Button(
            onClick = {
                val qty = quantityText.toIntOrNull() ?: 1
                if (name.isBlank()) {
                    Toast.makeText(ctx, "Enter a name", Toast.LENGTH_SHORT).show()
                } else {
                    vm.insert(name, qty) { id ->
                        Toast.makeText(ctx, "Saved with id = $id", Toast.LENGTH_SHORT).show()
                        name = ""
                        quantityText = "1"
                    }
                }
            }
        ) { Text("Save") }

        Spacer(Modifier.height(16.dp))
        Divider()
        Text("Saved products:", style = MaterialTheme.typography.titleMedium)
        LazyColumn {
            items(products) { p ->
                ListItem(
                    headlineContent = { Text("${p.name} • qty ${p.quantity}") },
                    supportingContent = { Text("id=${p.id} • ${p.createdAt}") }
                )
                Divider()
            }
        }
    }
}

How to insert a list of items into Room database Android

Room can insert a List in one call. You’ll get a list of rowIds in return when using @Insert. If you prefer “insert or update” semantics, use @Upsert.

Kotlin
Code
// Insert a batch with IGNORE on conflicts; -1 indicates ignored row in the result
val ids: List<Long> = repo.addAll(
    listOf(
        Product(name = "Pen", quantity = 3),
        Product(name = "Pencil", quantity = 2)
    )
)

// Or upsert if some rows may already exist (primary key collisions)
vm.upsertList(
    listOf(
        Product(id = 1, name = "Pen (updated)", quantity = 5),
        Product(name = "Eraser", quantity = 1)
    )
)

How can I check if data was inserted into Room successfully?

  • For @Insert, check the returned Long rowId. A positive value indicates success.
  • For @Insert IGNORE with a list, conflicting rows return -1 in the result list, so you can detect which inserts were skipped.
  • Observe your data via Flow<List<Product>> (or LiveData) to confirm entries appear after calling insert.

Java version: Android Room insert Java tutorial (minimal)

If you’re learning with Java, here is a beginner-friendly version using a background thread. This is a Room database step by step guide snippet for insert.

Java
Code
// Note.java
class="cd-package">import androidx.annotation.NonNull;
class="cd-package">import androidx.room.Entity;
class="cd-package">import androidx.room.PrimaryKey;

class="cd-annotation">@Entity(tableName = "notes")
class="cd-keyword cd-access">public class Note {
    class="cd-annotation">@PrimaryKey(autoGenerate = true)
    class="cd-keyword cd-access">public long id;

    class="cd-annotation">@NonNull
    class="cd-keyword cd-access">public String title = "";

    class="cd-keyword cd-access">public long createdAt = System.currentTimeMillis();
}
Java
Code
// NoteDao.java
class="cd-package">import androidx.lifecycle.LiveData;
class="cd-package">import androidx.room.Dao;
class="cd-package">import androidx.room.Insert;
class="cd-package">import androidx.room.OnConflictStrategy;
class="cd-package">import androidx.room.Query;

class="cd-package">import java.util.List;

class="cd-annotation">@Dao
class="cd-keyword cd-access">public interface NoteDao {

    class="cd-annotation">@Insert(onConflict = OnConflictStrategy.ABORT)
    long insert(Note note);

    // Insert list and get ids
    class="cd-annotation">@Insert(onConflict = OnConflictStrategy.REPLACE)
    long[] insertAll(List<Note> notes);

    class="cd-annotation">@Query("SELECT * FROM notes ORDER BY id DESC")
    LiveData<List<Note>> getAll();
}
Java
Code
// AppDb.java
class="cd-package">import android.content.Context;
class="cd-package">import androidx.room.Database;
class="cd-package">import androidx.room.Room;
class="cd-package">import androidx.room.RoomDatabase;

class="cd-annotation">@Database(entities = { Note.class }, version = 1, exportSchema = true)
class="cd-keyword cd-access">public abstract class AppDb extends RoomDatabase {
    class="cd-keyword cd-access">public abstract NoteDao noteDao();

    class="cd-keyword cd-access">private static volatile AppDb INSTANCE;

    class="cd-keyword cd-access">public static AppDb getInstance(Context context) {
        if (INSTANCE == null) {
            synchronized(AppDb.class) {
                if (INSTANCE == null) {
                    INSTANCE = Room.databaseBuilder(
                            context.getApplicationContext(),
                            AppDb.class, "app.db"
                    ).build();
                }
            }
        }
        return INSTANCE;
    }
}
Java
Code
// Insert from an Activity (run off main thread)
class="cd-package">import java.util.concurrent.Executors;

AppDb db = AppDb.getInstance(this);
Note note = new Note();
note.title = "My first note";

Executors.newSingleThreadExecutor().execute(() -> {
    long id = db.noteDao().insert(note);
    runOnUiThread(() ->
        Toast.makeText(this, "Inserted with id = " + id, Toast.LENGTH_SHORT).show()
    );
});

This Room database insert example Android (Java) avoids main-thread database work and shows how to observe results using LiveData<List<Note>>.

Transactions and error handling

  • Use withTransaction { ... } on the database for multi-step operations that must succeed or fail as a unit.
  • Wrap UI calls with try/catch in your ViewModel to display meaningful errors.
  • Prefer @Upsert when synchronization logic would otherwise require you to manually check and update existing rows.
Kotlin
Code
// Example: save multiple related operations atomically
class="cd-package">import androidx.room.withTransaction

suspend fun importProducts(db: AppDatabase, items: List<Product>) {
    db.withTransaction {
        db.productDao().upsertAll(items)
        // ... insert related rows or update metadata here ...
    }
}

Performance tips and best practices

  • Do not enable allowMainThreadQueries() in production; keep inserts off the main thread.
  • Use KSP for Room’s compiler to speed up builds in Kotlin projects.
  • Use List or vararg inserts to batch data and reduce overhead.
  • Return row IDs from inserts when you need to navigate to details immediately after saving.
  • Migrate to @Upsert for clean insert-or-update logic (Room 2.5+).
Pre-flight checklist: insert data into Room database in Android
  • Dependencies added: room-runtime, room-ktx, and KSP compiler
  • Entity annotated with @Entity and primary key set (autoGenerate if needed)
  • DAO has @Insert (and optionally @Upsert) methods marked suspend
  • Database built as a singleton with Room.databaseBuilder (no allowMainThreadQueries())
  • Repository encapsulates DAO calls; ViewModel uses viewModelScope.launch
  • UI triggers insert and observes Flow<List<T>> or LiveData for updates
  • Bulk inserts: choose proper onConflict (e.g., IGNORE for skipping duplicates)
  • Verification: check returned rowId(s) and ensure list updates in UI

Output / Result

After running the app:

  • Typing a name (e.g., “Notebook”) and quantity (e.g., 2) and pressing Save shows a toast like “Saved with id = 1”.
  • The new item appears instantly under “Saved products:” because the UI observes a Flow<List<Product>> from the DAO.
  • Inserting a list returns a list of row IDs, so you can confirm which inserts succeeded (non-negative IDs) or were ignored (-1 on IGNORE conflicts).

FAQ

What is Room database in Android and why use it?

Room is a high-level wrapper over SQLite that provides type-safe DAOs, compile-time SQL validation, and integrations with Kotlin coroutines and Flows. It helps you save data locally in Android with fewer bugs and less boilerplate.

How do I create an Entity, DAO, and Database for Room?

Create an @Entity data class for each table, define a @Dao interface with @Insert, @Query, etc., and implement a RoomDatabase subclass annotated with @Database that lists your entities and DAOs. Build a singleton instance using Room.databaseBuilder(...).

How do I insert data into Room using Kotlin?

Define a suspend @Insert method in your DAO and call it from a ViewModel using viewModelScope.launch { ... }. For example, @Insert suspend fun insert(product: Product): Long, then call it via a Repository. See the Kotlin code above for a complete flow using Compose.

How do I insert data into Room using Java?

Use a DAO method like @Insert long insert(Note note) and run it on a background thread (e.g., Executors.newSingleThreadExecutor()) to avoid blocking the main UI thread. Use LiveData queries to observe results in the UI.

How can I check if data was inserted into Room successfully?

Check the returned rowId from @Insert. If you use onConflict = OnConflictStrategy.IGNORE for bulk inserts, failed inserts return -1. You can also verify success by observing the table via a Flow or LiveData and confirming the new rows appear.

Troubleshooting and common mistakes

  • Doing DB work on the main thread: Use suspend DAO methods and call them from a coroutine in your ViewModel.
  • Forgetting an auto-generated primary key: Make sure your entity uses @PrimaryKey(autoGenerate = true) if you want Room to assign IDs.
  • Using KAPT in new Kotlin projects: Prefer KSP for Room’s compiler to reduce build times.
  • Writing custom SQL for upsert: Use @Upsert on Room 2.5+ instead of managing insert/update branches yourself.
  • Not handling duplicates: Pick the right onConflict strategy (ABORT, IGNORE, or REPLACE) or switch to @Upsert.

Recap: Android Room insert Kotlin tutorial (beginner-friendly)

You learned how to add data to Room database with DAO in Android using @Insert and @Upsert, how to return row IDs, how to insert a list of items, and how to wire everything through a Repository and ViewModel so work runs off the main thread. The same concepts apply when you use Java, with background threads instead of coroutines.

Sources / Further reading

With these patterns, you now have a solid, future-proof way to insert data into Room database in Android—ready for your next app or course project.

Subscribe
Notify of
guest
0 Comments
Oldest
Newest Most Voted